


Ready to add "Master Streamer" to the list of self-bestowed claims to fame on your resume? In three years, I ran over 100 live webinars on a variety of platforms, the most effective usually being broadcast live on YouTube. Live streaming offered a realtime solution to interacting with prospects and clients while recording webinars live that could easily be shared later. Through trial and error (and almost losing my comfy software job), I learned all of the nuances involved with live streaming to YouTube. Please, learn from my mistakes and accomplishments so that you can have a successful live-streamed event, and no significant bloopers so you can keep your job (also don't use the "Master Streamer" title). Here's my set up guide to creating successful live stream videos:
Note: This is not a guide for how to use OBS or to connect it to YouTube; the following blog post will focus on the gear aspect of live streaming.
Download Open Broadcaster Software (OBS)

OBS is a free open platform software that allows you to stream to YouTube so you can stream professional-looking live productions.
Features that this free software offers:
Chroma key - Green screening
-The ability to switch through multiple scenes
-Studio Mode - allows you to see the upcoming scene before switching
-Live stream video from a camera or capture your computer screen
-Broadcast multiple camera angles
-Record directly to your computer while streaming
While OBS is excellent, I would generally avoid running it on a MacBook air while you have other software open. Trust me from experience; your production can go downhill very fast if you don't have a powerful enough machine.
Cameras

From my experience, cameras are the most challenging part of live streaming. DSLR cameras aren't designed with live streaming in mind. For instance, the batteries can overheat or die before the end of the live stream.
Most DSLR or Mirrorless cameras also don't have a clean HDMI output. I highly recommend getting a capture card. The capture card helps compatible cameras output clean HDMI - meaning you solely see the video and not all of the camera settings.
According to Elgato here are cameras that offer clean output with a capture card that are rented by Pro Photo Rental:
If you do not want to invest in the HDMI card (JUST DO IT) here are some tips for connecting your DSLR or Mirrorless cameras:
Canon
If you're shooting on canon cameras and you want to Livestream, you can't go directly from the camera to OBS. Instead, you'll need to download the EOS Utility for your specific camera. This will download multiple apps, but what you care about is EOS Utility 3.
You can find a list of EOS Utility for Canon cameras here.
Once your camera is connected, you'll have to add a new scene in OBS and capture the live camera view rendered in EOS Utility 3. Pro tip- don't move the EOS Utility screen on your monitor once you have it captured in OBS.
From my experience, EOS Utility 3 is testy at best and very faulty. The software will only open when the camera is connected to the computer by USB. Even then, it won't work on some machines.
Sony
While Sony seems to be a little less complicated than Canon here are a few recommendations:
- Turn off your HDMI info
- Use 1080p at either 30 or 60fps and do not record in 4k (or match your software settings)
- Connect through HDMI and not USB
- Consider getting a dummy battery (see below)
- Do not press record on the camera
Dummy Batteries
If you're filming on a DSLR or mirrorless and you want to make sure you can Livestream for more than an hour, you're most likely going to need a dummy battery. The dummy battery allows the camera to think there's still a battery attached. Yet little does the camera know that it's getting its delicious juice from a sustainable source (the wall plug), effectively letting you shoot for as long as you want without thinking about power.

Sony NP-FW50 AC Power Supply Adapter
The dirty little secret about the Sony NP-FW50 battery is that it is pretty short-lived, which can be a real problem if you're trying to shoot all day. If you happen to be shooting near AC plug-in power, an inverter, or a generator, then this kit will keep you powered up for as long as you need. Safe, regulated power that you can trust.

This is great if you’re shooting time lapses or working in a busy studio environment while using power intensive functions like live view. Just plug the dummy battery into the camera body and the plug into a wall outlet and you’re off to the races.
Lens
If you decide to use a DSLR or Mirrorless camera instead of a webcam, you get your choice of glass. I recommend a faster lens - meaning glass with low apertures that let in more light and allow you to achieve a shallow depth of field (being the benefit of using a DSLR/mirrorless in the first place).
Canon

35mm is my favorite wide focal length; it's great if it's just one person on camera and possibly even two. The f/1.4 allows for a great shallow depth of field, but I usually try to keep it around 2.2 to make sure the majority of the face is in focus.

If you need something a little wider to fit in more people, I would stop at 24mm on this lens. The aperture of f/4 isn't super wide, but to make sure you're getting everyone in focus, I'd probably set it at 4-5.

If you have two cameras and want two angles, I suggest trading up one of the lenses to be a little closer up to your subject. The nifty fifty will be great for a tighter shot of one individual. Shooting this lens wide open will give you more of that bokeh background.
Sony

This full-frame wide lens offers an awesome f/1.2, allowing you to have a wide image, with a still incredibly shallow depth of field. This will be great to use for groups of 2 or more in your shot.

Yet again, being my preferred focal length, this is my top recommendation if you only have 1 or 2 people in the frame.

If you want to get in a bit closer, I love the 50mm as a second angle. Offering more bokeh and a tighter shot.
Want to get even closer to your subject? You can, but for this purpose, I generally don't recommend it. For live streaming, a wider view is more relaxed and casual. Getting up to close might make viewers feel uncomfortable.
HDMI Capture Cards
If you do choose to use your DSLR, avoid brain surgery, and invest in an HDMI Card. You should expect to pay over $100 for whatever brand you want. Here one I prefer:

Compatible with either Mac or PC, this allows you to have clean HDMI output from most cameras to OBS. The manufacturer Elgato provides a list of all camera brands that have clean HDMI output with an HDMI Capture card. You can find the list here.

AGPTEK 1080p Live Stream Capture Card
Another great option is the AGPTEK, while the devices name might not be pretty, it's clean output at up to 1080p 60fps is! It's great for video conferences and live streams. Alternatively, you can use it for streaming a gaming device such as a Playstation or Xbox. It is a plug and play device, which means you don't have to worry about downloading drivers. It is compatible with Windows, OS X, and Linux.
Use a Podcast Mic
Do not use your computer's mic. I repeat. Do not use your computer's mic. I highly recommend using a quality podcast mic; otherwise, you will receive complaints from viewers, and they will hop offline quickly just due to the audio alone.
Pro tip: If you do choose to use an external mic, remember to turn off the camera mic in the OBS settings.
Here are three podcast mics I recommend trying:

Audio-Technica AT2020USB+ Microphone
This handy USB mic is compatible with both Windows and Mac and focuses on the vocals, eliminating background noise.

The Shure MV7 creates amazing professional sound for spoken or sung vocals due to the dynamic microphone capsule that features a unidirectional cardioid polar pattern, perfect for isolating your voice from most of the background noise.

Go big or go home. You'll find this mic at nearly every radio station due to its high performance. It also reduces proximity effect, allowing you to move while talking. I'm pretty sure the only thing it won't fix is my lisp. If you chose to use this mic because of the broadcast quality, you're going to need a USB audio interface like Scarlet 2i2 or Go XLR.

Audio-Technica AT8024 microphone
If you're using a DSLR, you can go through your camera as well, using a shotgun mic. Since it has a very directional pick up pattern, it reduces undesirable ambient noise.

Focusrite Scarlett 2i2 USB audio interface
The Scarlett 2i2 allows you to take full advantage over your USB microphones. The two included preamps provide excellent, clean sound. Plus it is super simple to use and travel with. It’s also able to provide 48V phantom power for those mics that need it.
Lighting
Don't skip lighting! If you have nice soft lighting from a nearby window, lucky you! Even then, I'd probably have another video light setup. I highly recommend something that is dimmable, and that can change color temperature. Especially if you have more than one person in your shot, I suggest using at least two video lights to illuminate everyone evenly. LED is the way to go; these lights generally don't get as hot, and most are designed to cast soft lighting. Here are a few of my top picks:

Powerful yet soft, dimmable, and also with variable color temperatures.

Fotodiox Pro LED-312DS Digital On-Camera LED
Since it's designed to be on camera, this light is much smaller but still providing a punch. It's both dimmable and had offers variable temperatures.

Chimera 30" Lantern (China Ball) with Triolet Kit
Illuminating larger spaces with soft and even light is as easy as hanging this setup directly from the ceiling. Included in this kit is Chimera’s triolet light kit with a Chimera 30" latern (china ball), a 1K Halogen bulb, and 1K dimmer so you have everything you need for an easy and customizable setup.

This on-camera LED is both customizable and powerful. The Rotolight creates a soft, ringlight effect on your subject with a powerful output and beautiful color rendering.
Livestream To Multiple Platforms at Once
So maybe YouTube isn't enough, and you want to stream to Facebook and LinkedIn simultaneously. There are a few platforms that will allow you to go from OBS to multiple platforms for a fee, to learn more check out Restream.
You're going to want to proceed very cautiously here. It's against terms of service to Livestream to Twitch and another platform at the same time. Twitch has sole broadcast rights for 24 hours.
Green Screen
If you're planning on green screening and you're relatively new to the video world, make sure you have very even lighting. You'll want the backdrop evenly lit and your subjects, for OBS to pick out everything correctly. You also don't have to use green - bright blue and pink work just as well. A pro tip is not to wear the same color - which I would forget often. Check out these simple solutions:
Backdrop Fabric Green Screen (10x10 ft)
You'll need a backdrop system to support this, find it here.
I generally opt for seamless paper as a backdrop; you can get that here.
Stream Deck
Want to get fancy with your Livestream? Get a stream deck to set up custom controls to switch between scenes, launch your social media, add noises, pop-ups, and more. These come with 5, 15, or 32 keys. Check out this beast stream deck:
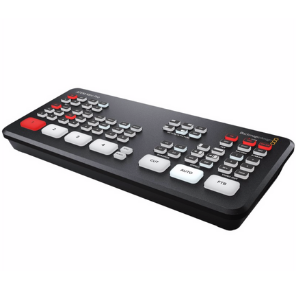
Blackmagic Design ATEM Mini Pro Switcher
The Blackmagic Design ATEM Mini Pro is a 4-input live production switcher with a built-in hardware encoder for your multi-camera live streams. You feed it up to four 1080p signals, mix it how you like, and then send the final output via USB-C. It also has an HDMI out for you to monitor.
In addition, you get two 3.5mm Mic inputs along with the audio from the 4 HDMI inputs, and all of the audio sources have a pretty powerful audio mixer available. Set inputs to off, on, or audio-follow-video, adjust gain, metering, and even control audio effects with a compressor, gate, limiter, and 6-band EQ.
PC/MAC Requirements
You can Livestream on most any modern Mac. If you do, just make sure it's locked and loaded with at least 16gb of RAM and a strong CPU. If you're on a Macbook Air, you probably won't be able to run any other heavy-duty software. If you're solely running video, you will probably be fine, but I've run into issues with live streaming video and screen sharing bulkier software while live streaming. Pro tip - use long enough cords to your camera, an external keyboard, mouse and monitor so you can tuck your laptop away to eliminate fan noise.
If you plan to live stream video of yourself and screen share simultaneously, the PC route may be best for you. As a baseline, you want an i5 or higher, a minimum of 8gb of RAM, and a dedicated graphics card. For the best performance, I recommend using a gaming computer, especially for those wanting to run bulky software while they screen share and green screen. Yet again, if possible, I recommend tucking your laptop or tower away to reduce the mic picking up fan noises while live streaming.
A Few Pro Tips
- Do you like your job? Do you want to keep it? Cool, test everything before you run it.
- Do not set up an hour before your live production. Give yourself at least two hours, just trust me on this.
- Have someone help you by answering questions in the chat for you! It's fantastic to have a set of hands off-camera typing in responses and sending links!
- When you hit the go button on YouTube, you're live. Don't question it. Immediately start talking, because there will be a delay in what you see. You'll look like a giant dork waiting to see yourself move.
- Do not have your laptop or desktop close to the mic. The mic will pick up the fan really easily, and it's probably going to run at full speed. I suggest tucking your computer under a table to mitigate noise.
- Your internet connection will make or break you. Make sure you have reliable wifi, but I usually opt for being hardwired in.
Now you're a live stream guru! Let us know what works for you or questions you have in the comments. If you're looking for more resources on live stream check out this guide "how to setup the perfect space at home for your DIY social media videos."