


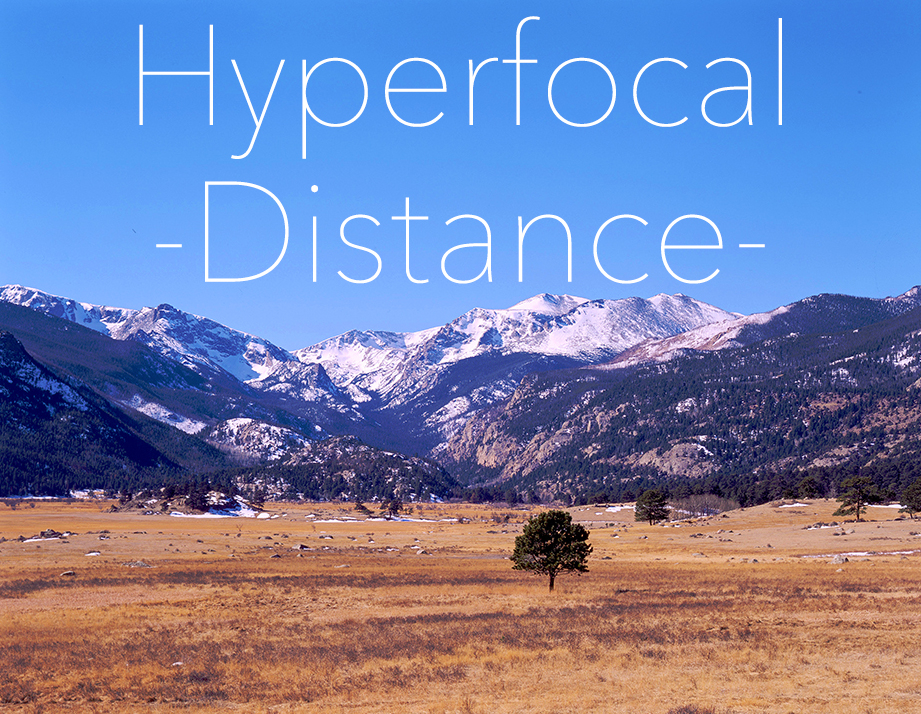
Being based in Colorado, everyone here at Pro Photo Rental is spoiled when it comes to the great outdoors. Everywhere you look there’s natural beauty waiting to be photographed. But there’s more to landscape and nature photography than setting up a tripod in front of the mountains, letting your camera autofocus, and pressing a button.
Creativity in nature photography is important, and often there are subjects in your foreground that you want to include in the image, but you also want to keep the mountains in the distance in focus. There are several ways to do this: focus stacking, camera movements like tilt, and the use of hyperfocal distance.
The tilt camera movement is a fantastic tool, but is limited to tilt/shift lenses and large format cameras, and is covered in its own blog post. Focus stacking is a great technique for macro photography that can also be applied to landscape photography, but this requires extra time in front of the computer to combine multiple images. There’s a specific blog post for that, too. Hyperfocal distance, the subject of this post, is a technique that can be used quickly in-camera to get as much in your scene in focus as possible without wasting depth of field.

© Eric Michalski, 2015
So, what exactly is hyperfocal distance? Put simply, hyperfocal distance is a point where a lens is focused so that depth of field extends from half that point all the way to infinity and no further- thus, all of the depth of field in an image is used. This gives you as much focus as possible in an image front to back.
This focusing point is different for every lens, which is why most lenses come with a depth of field scale. This scale is used to determine where you’re placing the optimal plane of focus as well as to determine entire range of depth of field for your particular focal length and aperture.
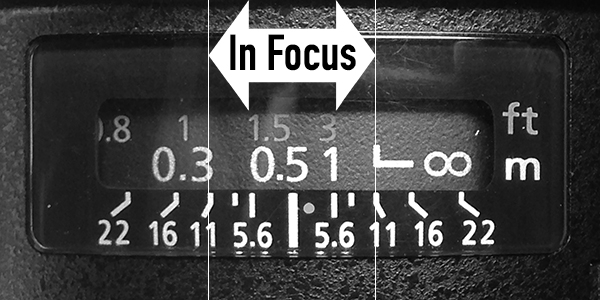
When viewing the depth of field scale, use the aperture your camera is currently set to. We’ll use f/11 as an example. You’ll see there are two f/11 markings on the scale. The f/11 on the left of the scale is for the nearest point of focus relative to the camera, while the one on the right is for far focus. Inside the scale, where the numbers move when you rotate the focus ring, are distance markings. The distance between the f/11 symbols will be everything that is in focus at f/11. In this example using a 14mm lens, everything from about 1 ft to infinity will be in focus. This puts the hyperfocal distance at around 2 ft. There were no calculations used to find this number, just simple alignment of the scale. If you were to use a hyperfocal distance calculator you might find a slightly different number, but its going to be close.

In this image we’re using f/22 as our aperture value to determine focus. The infinity symbol is just to the right of the scale out of view, but the line delineating where infinity focus is located is aligned with the f/22. According to the scale, everything from ~0.7ft away to ~infinity will be in focus.
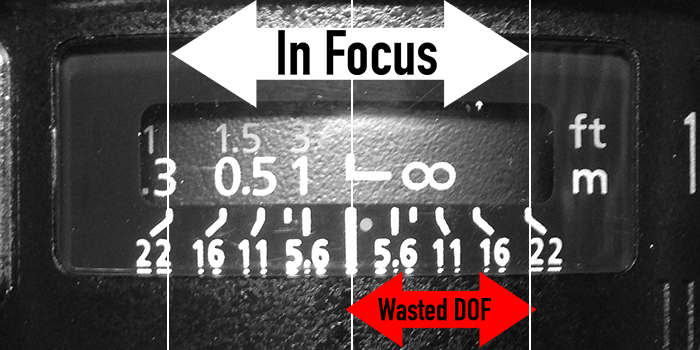
In this last example we’ve put the plane of focus at infinity. This is what your camera might do while autofocusing on a very distant subject. Using f/22 as our aperture, the scale states that depth of field is achieved from just beyond 1 ft to past infinity. Obviously we cannot see past infinity in our scene, so this area of focus is wasted. Judging from the previous example, we could have depth of field from ~0.7ft to infinity. This could be the difference between getting those daisies in focus or not.
Note: these numbers are approximate.

In this illustration there are foreground, midground, and background subjects in the composition. In order to get each one in focus, we’ll focus our lens at its hyperfocal distance, highlighted in blue. By focusing in the midground, we’re able to gain enough depth of field to keep the foreground, midground, and background subjects in acceptable focus. Its important to keep a close eye on your depth of field scale on your lens. This particular example would most closely apply to a wide angle lens with a small aperture. If we were to show an illustration of a telephoto lens with a large aperture, the depth of field range (orange lines) would be much closer together. We would therefore not be able to get all of our subjects in this example in focus at once.
Diffraction:
Diffraction sets in across each lens differently and at different points. One lens might be acceptably sharp at f/22, while another lens may be far too soft at f/22. While stopping down will always lead to increased depth of field, it does not always mean a sharper image. Generally the sweet spot of most given photographic lenses will be around f/8-f/11. Closing down the aperture to smaller sizes will inevitably invite diffraction and will lead to a loss in sharpness, no matter what lens you’re using. While it may be easy to just stop down as far as your lens can go to achieve greater depth of field, your image may actually turn out to be softer than a wider aperture. This is when hyperfocal distance is key. Using a wider aperture, such as f/11, will lead to a sharper image, but less depth of field. But by focusing at the hyperfocal distance, you can expand your depth of field by as much as possible, therefore taking full advantage of that aperture and its inherent sharpness.
Conclusion:
Hyperfocal distance is not a magic bullet. Its impossible to get something less than 1ft away from the camera in the foreground exactly as sharp as the mountains in the background that are miles away without using tilt or focus stacking. You could drive yourself crazy aligning things just right and measuring distances with a distometer so that everything is perfect, only to find your real world results are off. The sharpest part of the image will always be your exact plane of focus. Increased depth of field extends the range of acceptable sharpness, but its important to understand that the extended depth of field will be slightly less sharp than the true plane of focus.
Its difficult to talk about focus and sharpness without talking about camera resolution, diffraction, print size, circle of confusion, and sensor size. Its very easy to get lost down the rabbit hole of calculating optimal sharpness with a given camera unit and output. Most of us don’t want or need to get down to that level of precision, but its definitely part of the game when it really comes down to critical sharpness.
Optics is a science to be sure, but landscape photography isn’t shot in a laboratory. Things go much faster and are a lot less frustrating when you realize that readings should be taken as approximate and that slight adjustment is always required. While an object may technically be within the range of depth of field, it may be less sharp than you might hope it would be. In this case its good to make adjustments on the fly. Fortunately now with modern day cameras, focus checking is almost second nature so its easy to make sure you’re where you want to be, and when using hyperfocal distance you can get there a lot faster.