Focus Stacking
The discipline of photography has gone through some pretty significant changes in the past 30 years. Film to digital, manual to autofocus, still to video… One could argue that more facets of photography have changed than have stayed the same. There is, however, one aspect of photography that is the same now as it was 30, 50, or even 100 years ago. This singular cornerstone of image making has remained unchanged since the first image was recorded in a camera obscura, and it has shaped the way we record light by forcing us to work within its laws. This unflinching, unbending pillar of lens-based imagery is, of course, physics, and we are bound by its rules and regulations, at least for now.
Usually, achieving acceptable focus isn’t a difficult task, particularly with modern day autofocus systems like those in the D850 and ultrasonic autofocus motors found in almost every autofocus lens. There are, however, physical limitations that put a cap on how much depth of field, and subsequently sharpness, you can achieve in an image. Take macro photography as an example.

Macro photographers often run into situations where they lack sufficient depth of field to render their entire subject in focus, particularly when achieving a 1:1 or greater reproduction (subject appears the same size on the sensor as it actually is in real life, or larger). Usually, macro photography involves the use of moderately long lenses combined with very short focusing distances to photograph a small object. The combination of these factors will typically result in an extremely shallow depth of field, even when stopped down to smaller apertures to expand depth of field. In practical terms, this could mean only getting the antenna of an insect in focus instead of its whole body.
Landscape photographers also run into this issue. It’s typically desirable to have foreground interest in a landscape image, as well as background interest. To achieve foreground interest, landscape photographers will seek out flowers, cracks in dry mud, interesting rocks, or bubbles in frozen lakes to bring interest to the foreground while also achieving an interesting background. The trick is to have acceptable focus on both the foreground as well as the background, but focusing on a daisy a few inches fromthe lens as well as the mountains miles away in the background isn’t an easy task.

To complicate matters further, camera manufacturers are heading ever towards higher and higher resolution sensors. This allows us to capture more detail, print larger images, and have greater control over cropping in post, amongst other benefits. Other than the strain it puts on our hard drives, this is mostly good thing. However, as we capture images at greater and greater resolutions, our lenses have to work harder and harder to render enough detail to take advantage of that resolution. Put simply, the higher resolution your camera, the less usable depth of field you have.
This problem is not new, and there are many ways to work around the issue of having too little depth of field, regardless of the cause. One solution is to use tilt/swing lenses to shape depth of field into a wedge instead of a plane parallell to the sensor. While effective, making use of the Scheimpflug principle, as it is called, can be tedious and requires specialized, often expensive lenses (but you can always rent them!). Another remedy for landscape photographers is the use of hyperfocal distance, which allows landscape photographers to set their plane of focus at a particular distance away from the camera. By not focusing on the background or foreground, but rather somewhere in the middle, acceptable focus might be achieved on the foreground all the way to infinity. This method is not fool proof, and not even available for macro photographers. Plus, since “acceptable” focus is an extremely subjective term, it may be more difficult to achieve “acceptable” focus on all focal points when using hyperfocal distance. When all else fails, there is another option: focus stacking.
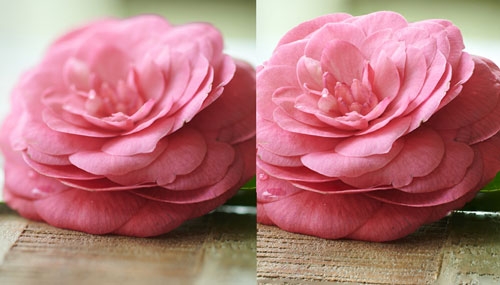
Instead of expanding depth of field in one image, focus stacking relies on multiple images shot at the lens’s sharpest aperture to be combined later through software into a single image with perfect focus front to back. This term is more or less interchangeable with focus "bracketing" which is more specific to the actual capture of the images. This technique is easier to execute than you might imagine. Some camera bodies like the Nikon D850, Nikon Z 7, and the Phase One XF make the process even easier by automating the capture process. The key is to take multiple images of your subject, carefully shifting focus incrementally front to back across the subject between each exposure. At the end of the stack, you should have several images focused at different points along your subject so that, when combined in focus stacking software, you have a perfectly sharp image. Depending on the subject and how shallow the depth of field is in each image, you might find yourself shooting upwards of 100 images for an effectively focus stacked photograph.
Focus stacking requires a good, stable tripod and a subject that doesn’t move. It’s best if you’re able to tether to a computer so you can remotely control focus and fire the camera from software. We recommend Capture One Pro to tether into, as it offers the greatest amount of flexibility and control across most camera brands, and is required for use with our Phase One 100MP. Once you’ve captured your images, you’ll need to import them into another piece of software in order to stack them. We recommend Helicon focus, as it is easy to use and offers several stacking options depending on subject matter.
Step 1. Setting up your workspace
You'll need a clean workspace to start. Begin by locking down your tripod and ensuring it won't be bumped or moved. Next, secure your subject so it doesn't have a tendency to fall over or be blown around by a soft breeze or fan. You'll then need to light your subject, and if possible, tether to Capture One Pro. If you're using a camera with automated focus stacking capabilities, sometimes called focus bracketing, you'll need to make sure your lens is capable of autofocus.
Step 2. Shooting
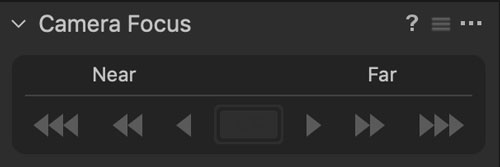
Use Capture One’s autofocus tool in the live view window to focus on the very tip of your subject that is closest to you. Take your first image, (some people like to photograph their hand before the first image and after the last image of a stack so they know when the stack begins and ends while going through images on the computer). Use the single, double, or triple arrow keys in Capture One’s autofocus tool in the live view window to move the focus point towards the back of the subject away from the camera. If you’re shifting focus by manually adjusting the lens with your hands, you’ll want to do your best to not move the camera while doing so, and you’ll also want to move the focus along the subject at more or less even increments. This makes it easier for the software to stack the images afterwards.
You will continue to move the focus across the subject incrementally, taking an image after each change in focus until you’ve captured every part of the subject you want to have in focus. Remember, you might need to capture a lot of photos for the best looking stack. Depending on the size of the subject and lens you’re using, you might need anywhere from 3 to 300 photos. If you're unsure of how many images you need to capture for an effective stack, more is always better, assuming your computer has the horsepower to put them together in your lifetime.
Step 3. Post
After your images have been captured, you’ll want to make any RAW adjustments before sending the images out to be stacked. Select one of the images in Capture One and apply any needed color and contrast edits as well as any highlight and shadow recovery necessary. Copy those adjustments and paste them across all other images in the focus stack. Once completed, process all images in the stack out as JPEGS or TIFFS to their own folder.
![]()
Open Helicon Focus and import your processed files. Choose your preferred stacking method and click render. You’ll likely want to experiment with different rendering methods and practice taking effective images for focus stacking, but after some time you should be able to be able to process out a finished file with front to back focus that would have likely been impossible if not for this technique.
Happy Stacking!
Products mentioned in this article:


